If you’re using the Casting Networks talent representative worksheet to keep track of your actors and projects, then you already know how useful it can be to help you with your daily tasks. And if you’re like most talent representatives, you’re always trying to find ways to work smarter. There are several ways that you can customize your talent representative worksheet to maximize efficiency and better organize your workflow. Here are a few tips that you can use to get the most out of your talent representative worksheet.
Grouping and reordering your worksheet
If you’ve ever wanted to group your columns in your talent representative worksheet, you’re in luck! This can currently be done in one of two ways: grouping by project and grouping by talent.
You can group your worksheet by talent or project easily by simply dragging and dropping the column header to the “Drag Here to set row groups” section. Once done, you can use the up/down button to view your talent or projects in alphabetical order if you like. You can also type what you want to see in your filter to better view your data. For example, if you want to know who’s on top of their auditions, you can check your talents’ consistency.
You can even reorder your worksheet by dragging and dropping the column header to the front so that you can view your worksheet however you want.
The art of filtering
There are several ways you can view your talent representatives worksheet. If you’re the talent agent who tends to go by the schedules, you can filter your worksheet according to the schedule/due date and you’ll know exactly when you need to get your talent’s auditions in front of casting directors.
If you want to know what date the casting director sent you a request or schedule, you can choose to view by the received date (It’s recommended that you only select one date at a time in order to see which notifications came in on each day).
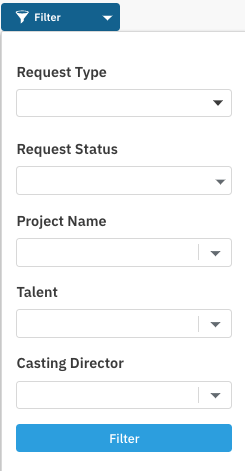
You can filter your worksheet by going to the “Worksheet” tab and selecting the “filter” button. Once you’re in, select whether you’d like to view by schedule / due date or by the received date. After you’ve made your choice, hit the calendar icon, adjust your dates, and hit “Search.”
That’s not the only way you can filter your talent representatives worksheet. There are more than 21 ways to view your activity, including request types, request status, project name, talent and casting director. Try filtering a few different ways yourself to see how you’d like to continue your work or view the list at our support page on using the worksheet.
Forwarding requests to the talent
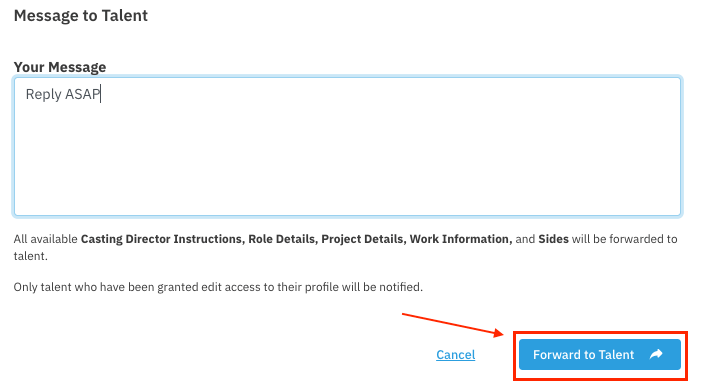
Getting talent their auditions and requests is easy. By forwarding to talent via the worksheet, talent will receive an alert and be able to see the project and role details, sides, work information and any instructions from the casting director all at once. From the alert, the talent will also be able to upload their media and send it back.
Do this by clicking the right-facing arrow on the request’s modal. Feel free to add a note with any additional details if you like, or just send it off. You can even forward multiple requests at once for convenience. Do this by selecting the checkbox on the left-hand side of each request and hit the “Forward” button in the bottom right corner.
Gating media requests
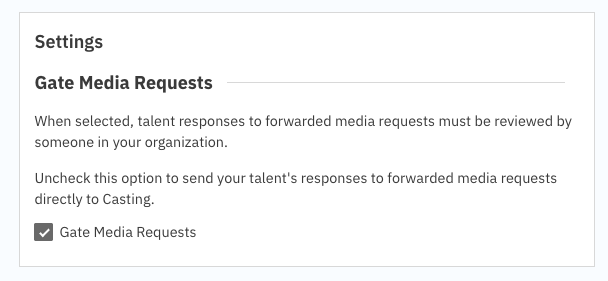
Another great feature of the Casting Networks talent representative worksheet is the ability to gate your media requests. When your actors respond to media requests you’ve forwarded to them, such as self tapes, there are a few ways to decide how things move forward. Talent agents can either have their talent’s responses go directly to casting, or you can choose to have your performers’ responses “gated,” where they are held for your personal stamp of approval. If you prefer the gating option, it’s going to be your job to review media requests and then forward to the casting director.
Remember, the “Gate Media Requests” setting is turned off by default. This setting applies to your entire company, and you will need to have an admin account for your company turn it on if you want to use this feature. Once it is turned on, all reps and divisions will have to forward talent responses and media to the casting director.
To gate your media requests, log into your account, select your name in the top right corner and head to “account settings.” Pop into the “administrative” section, adjust the “Gate Media Requests” setting by checking it on or off and save it.
Now that you’ve got these tips to make the most of your Casting Networks talent representative worksheet, it’s time to put them into practice. Login to your account now to try a different filter or two, group your worksheet by talent, forward some requests to talent and even give gating media requests a go. You’ll be surprised how much more efficient your workflow will become from a few simple modifications. You might even find a new way to organize your worksheet that you didn’t know you needed!